Showing posts with label Crafts. Show all posts

Wednesday, June 1, 2011

Ideas

This is a high image post, so beware.  I just joined Pinterest, which is probably one of the coolest sites I've ever seen!  I follow a ton of blogs, and find a bunch of amazing tutorials that I love, but organizing all of the tutorials so I can find them again is a pain in the butt.  I have just been creating bookmark folders for them, but then I have to constantly export and import my bookmarks to other folders, which just adds to my troubles.  With Pinterest, you can "pin" items that you see into folders that you customize.  Now no matter where I am, I can look up my favorite sites an tutorials!  

In order to add an item to Pinterest, it does have to be posted online, so I am posting some of the craft ideas that I have gathered over the years.  I am not sure who made them, so if you know please reply so I can give them credit.

Monday, May 16, 2011

Freezer Paper Stencils and Baby Onsies

Today's tutorial is on Freezer Paper Stenciling.  I's seen it done on some adorable blogs as of late (Especially this one and this one), but had never attempted it before, and I was super surprised at how easy it was to do.  I was mostly surprised that I actually LOVED doing it.  I decided on a whim the night before Shambray's baby shower that I was going to make her some onesies and this is the result. 

Adorable?  Naturally.  You wanna learn how to do it?  Do ya? Huh?  

Ok, you talked me into it.

Freezer Paper Stencils.  
You will need the following:
-Fabric paint (I got this multi-pack of puff paint at Walmart for $10)
-Clothing item of your choice (I'm going to do some of my shirts next)
-Freezer Paper (NOT WAX PAPER or you will never get the stencil off your clothes.  Freezer paper is dull on one side and kind of shiny on the other side, and it is the same type of paper your butcher wraps cuts of meat in.
-Iron
-Your design
-Cardboard cut to fit inside the clothing you are stenciling to prevent the paint from bleeding onto the other side.
-1in foam brush (these are about 60 cents at Walmart)
-small dish for your paint
-Something to cut it out with.  I used my Cricut Machine with the program Sure Cuts a Lot.  You can read my opinions/reviews on such here.

1. Iron your clothing item

2. Lay your Freezer Paper shiny side down and cut out your design.  Remember to save any inside pieces as you will use them.  As a side note my settings for cutting freezer paper on the Cricut were Blade 2, Speed 1, and Pressure 3.
3. Lay your design shiny side down on your clothing item and iron in place.  Make sure that all of the edges are ironed down tight.  Do not use steam.

4. Squirt out your paint and dip your foam brush in it.  Less is more and you can always pour out more paint later.
5. Paint on your color making sure your paint does not go over the sides you don't want to paint.  Apply as many coats as needed for nice, even coverage.  Allow paint to dry (at least 20 minutes)

Another nice thing to note, this stuff is a lifesaver when it comes to cleaning your brushes, or cleaning it off the carpet if you happen to knock the brush off the table.  I'm speaking from personal experience here.
6.  Once the paint is dry, remove the freezer paper, making sure to get all of your little inside pieces out.  I find tweezers and a needle are the best tools for the tiny ones.

7. If you are doing an image with multiple layers, paint the first layer then wait for it to dry and remove the freezer paper, then iron on your second layer.  Make sure to iron on all of your little details. 


8. Paint on your second layer, allow to dry, then remove the freezer paper.


These were so popular that I got a request for another one.  It's one of my favorites.

If you think of any other cute sayings you'd like to see please comment below.  These designs are for sale at my Etsy Store, though if you live in Utah feel free to email me your request and I'll waive the shipping.

Cricut Product Reviews

As some of you may know, I own a Cricut Personal Electronic Cutting Machine like this one.

Sadly, I can't exactly say it was love at first sight.  I had read up on the Cricut online, and was disgusted with it's need for cartridges.  When you spend good money on a machine, no one wants to be told that they have to spend $30-80 a pop to make it usable!

I was pretty much set on getting a Silhouette, which is far more expensive but does not require cartridges, until Christmas morning, when I opened the biggest present to find that Alan had bought me a Cricut Personal Electronic Cutting Machine.  I'm sad to say that I was not as enthusiastic when I opened it as Alan was hoping I would be.  I was really impressed with him for getting it at such a deal - $180 marked down to $80 at Roberts.  They hold that sale about twice a year, and it's very much worth waiting for the sale, especially of they will let you combine coupons with it.

After receiving some other cute cartridges I finally decided it was time to stop whining and start using my Cricut.  Now I personally HATE cutting with just the Cricut.  I'm more anal than I am a perfectionist, so not knowing EXACTLY where each letter and swirl is going to go before I waste my pretty paper or vinyl is frustrating enough to prevent me from cutting with it at all, and doing a test sheet on scrap paper is just wasteful.  Cricut offers two different options to help out with this.

1. Gypsy - $210 on sale now for $100


The gypsy is a cartridge storage device that allows you to upload all of your cartridges.  You can then design and customize your design, and see it on the screen BEFORE you cut your precious paper.  You can create your images using multiple cartridges, and transform and move them any way you want.
As far as the negatives you can only use cartridges that you have uploaded to the Gypsy, and you cannot import outside images, text, dingbats, or true type fonts.  Additionally the screen is pretty small, so it is not ideal for the vision impaired.  It does have a zoom option, but I can imagine it would get pretty tedious to keep zooming and scrolling, especially if you're using a 12x24in mat.

2. Cricut Design Studio - $60
cricut-designstudio_1
The Cricut Design Studio is a program that you install on your computer, that has the entire Cricut library listed.  However, you can only cut the designs you own the cartridges for.  You have to load the cartridges for each project you use, but you can design using the entire library.  I liked that you could use the entire screen, and that I could test drive any cartridge before I bought it.
Negatives are that despite it being loaded onto your computer, you still cannot import outside images, text, dingbats, or true type fonts .  You also need to load the cartridge each time you want to cut the design, so it limits you being able to share cartridges with friends (though you can share your design files).

So the total for everything that Cricut has to offer:
Sale     Actual
$80       $180    Cricut Personal
$100     $210    Gypsy
$60       $60      Cricut Design Studio

$240     $450    Total not including cartridges.

CRAZY!  For all of it's marketing Cricut is really not good at making it so that you can do anything you can imagine with their machine.  I understand why they don't.  If people could use fonts and images from their computers there's no way they would spend $80 on a Cartridge no matter how cute it was.  It's all a marketing strategy (and a rather good one at that) which is incredibly frustrating to me, but I digress. I had the Cricut out of the box, and no marketing strategy was going to prevent me getting the most out of it!  So I searched for other options and found a glorious program.

Sure Cuts a Lot - $50

Can I tell you how much I LOVE this program?  If you are using a Cricut make sure you purchase the Sure Cuts a Lot 2.0.  Craft Edge (the makers of SCAL) was sued by Provo Craft (the makers of the Cricut) and as part of that lawsuit the newer versions (3.0 thus far) are not compatible with the Cricut, so if you own 2.0 do not upgrade it!  The program allows you to use any true type font installed on your computer, as well as any imported image or dingbat.  You can download true type fonts everywhere (my favorite place to get them is DA Font) and I have yet to find a project that I could not download what fonts and images I needed for  it for free.
The only negative is that there is no way to import your existing Cricut cartridges directly into the program, but if you can cut the image with your cricut then scan it into your computer, or if you can find the image online, you can easily import it into SCAL.  I only have two cartridges, so that's not a big negative for me.

Overall, with SCAL installed I use my Cricut a bunch, and it does everything I really need it to.  The biggest difference I see between the Cricut with SCAL and the Sillouette is the price.
Cricut personal 12x6in cutter $80 + SCAL $50 = $130.  The Sillouette SD 9x24in cutter = $300.  The sillouette does not have a smaller edition, so if you are looking for a cheaper alternative, the Cricut works quite nicely.  Even at the full purchase price of $180 plus $50 for SCAL the Cricut is still cheaper than the sillouette.

I hope this review has been helpful!

Monday, April 25, 2011

Craft Table Envy

I really like the idea of  a craft/sewing table that doesn't have to look like a craft table.  I love these two designs from Walmart.


If I were going to this one I would go with the lighter wood.  It would match the rest of my furniture so much better.
Or this one.
0004266601286_AV_500X500.jpg (500×500)
I love all of the extra storage space in this one, and I am amazed at how small it's "footprint" is when it's all folded up.  I would also rather have this one in a lighter wood, rather than the white paint.

Which one do you like best?

Wednesday, April 6, 2011

Glass Etching

I have been inspired.

It all started today when I was looking for some cute sayings to etch on the bottom of my pyrex dishes for Enrichment tomorrow.  I could just do my last name, but I would rather do something like this


Or


Those links take you to A Girl with a Glue Gun.  Her tutorials are great and super easy to follow!

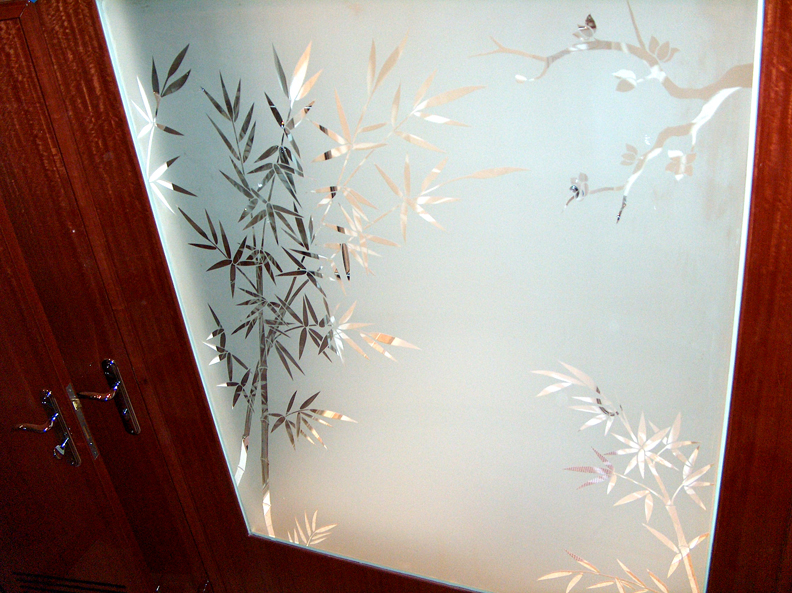
Oh but then, I came across this lovely web site.   Chris Sommer is a wiz with glass etching!  As a warning, there are some glass etched topless mermaids on there, so the site isn't 100% safe for work.  I now have a goal to be as amazing as him at it!  I'm going to start training by getting a bunch of dollar store picture frames and mirrors and practicing.  I'll post the ones I don't use personally on Etsy, so I can pass all of my supplies as "a way to bring in a little extra money" rather than a vain attempt to boost my crafty self.  I mean seriously!  Aren't these fabulous?

I would kill for this bathroom.  Pity mine doesn't have glass doors.

etchedglass-flower-closeup-door.jpg (792×593)
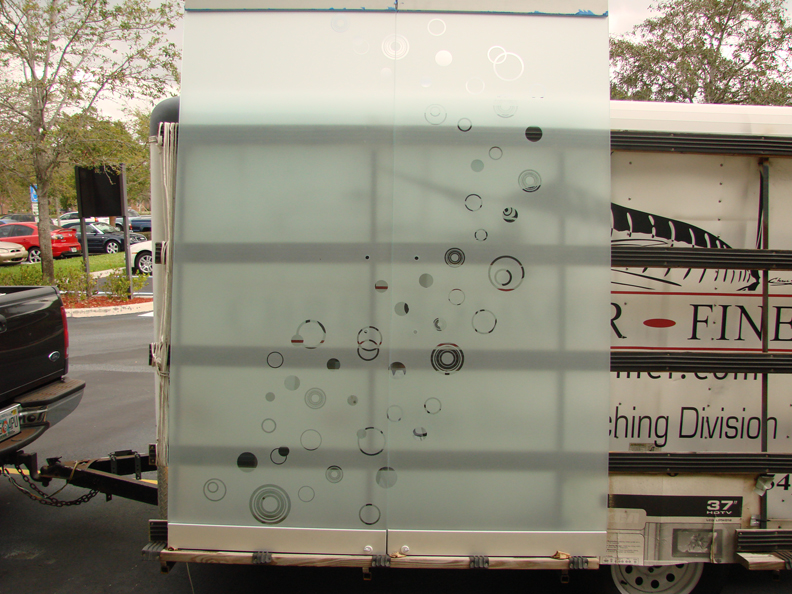
So pretty!  And this one I could probably actually do with my Cricut really easily.


I love how much detail he puts into it.  I don't know if I could get to the point of where mine look this good, but I could so handle the solid shapes ones.


Would anyone be interested if I did any glass etching?  I was thinking of doing something similar to this for a first attempt.  I would be happy to take requests, and it would be a great starter project.


What do you think?

Wednesday, August 25, 2010

This one's for you Shambray!

Now seems like a good time to promote some lovely tutorials by some fabulous people.

So cute! This would be adorable with pictures of each family member!

Her design is so cute and definitely would help keep your little ones snugly wrapped!